Monday, April 15, 2013

Red Light-Yellow Light


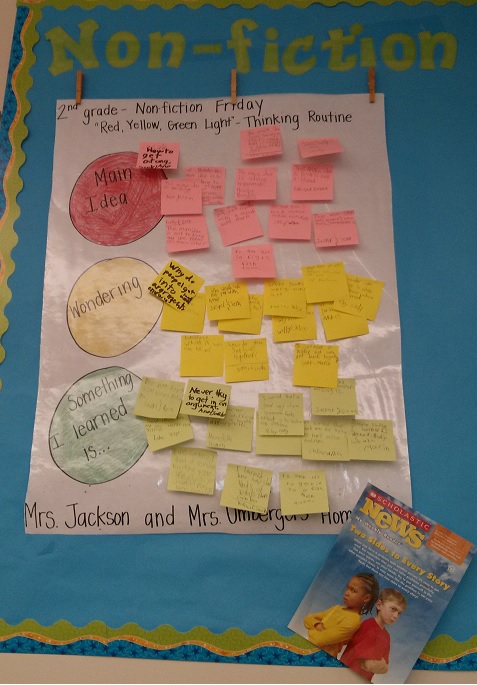
Connect: Almost every Friday, Shannon Umberger and I get our classes together for Nonfiction Friday.  The kids read an issue of Scholastic News or Time for Kids in partners. Shannon and I have adapted the Red Light-Yellow Light routine to accommodate the needs of our students and what we wanted them to get out of the activity. We added a green light to have a third area.

What I did: In partners or small groups, the students read Time for Kids or Scholastic News. Then, they write their thinking on sticky notes. For red, the students identify the main idea of the article. For yellow, they write a question they had while reading. For green,  the students identify new learning.


Extend: In order to really make this routine effective, we have used it (so far) for a total of 13 weeks! Now it truly has become a routine and the students are able to identify each part of their thinking easily. Their questions are becoming deeper and you can really see their thinking becoming more collaborative. I have noticed that after so many weeks of doing this routine, students have become much better at identifying the main idea of their readings in class and not only during Nonfiction Fridays.

Challenges:
In the beginning, the main challenge I experienced was that the student’s questions were not very deep. They would ask questions about why an animal was a certain color, or why a character was named something. It was a challenge to get them to think about their questions regarding the actual contents of the story rather than about some minute detail.

The Explanation Game!

Connect:  This thinking routine was to continue the work our class had done through our 'See, Think Wonder' routine.  I wanted a way to really have them connect the scientific learning we had done (and are in the process of) to what they were seeing and apply it to the rocks we were studying in our classroom.  For some reason, I must have skimmed over this routine while reading the book because when I went back to look at a new routine to mix things up, this one really spoke to me and I didn't remember it from my original read.  The purpose of this routine was to have my class begin to explain and use scientific reasoning to explain what they observed in rocks. 

What I did:  I introduced this routine to my class by being very honest and saying that I really wasn't sure how I wanted them to show me the outcomes of this routine-but it sounded very fun and seemed to be just what our class needed. I read the section in the book (the gray box) and said I thought we might adapt it a little.  I guided their thinking to four ideas/questions that we needed to explain for our 'Explanation Game' round. 
  • What is it?
  • What is it for?
  • How do you think it was made?
  • What makes you say that?


I showed them a 'Desert Rose' rock (you can see it in the third photo) that I had been given last year as a gift.  It is a really fascinating rock that even I dont' know much about.  I then asked them to brainstorm ideas on how they wanted to show me their thinking.  One class came up with the idea of a giant cootie catcher (they have a fondness for them with their multiplication facts!) and the other wanted to do a class anchor chart.  Here are pictures of each of them:

Extend:  My plan is to use this routine again, but have it a little more structured.  Both classes did a great job of showing their thinking and I would like to combine their creativeness to come up with a routine that I can use in both classes. 

Challenge:  The biggest challenge for this routine was that it took us two class sessions to complete.  I think this may have been mostly due to the fact that it was our first time and I wasn't very clear on what I wanted as an outcome for the routine.  I felt like this allowed for a lot of genuine conversations and the students were really trying to figure out how this rock was formed and create scenarios based on their scientific knowledge.  I really enjoyed it and will be using it again!

Tuesday, April 9, 2013

Chalk Talk


Connect: Each Friday we work on non-fiction with Mrs. Jackson's homeroom.  Students pair up and read articles from 'Scholastic News' and 'Time for Kids' to extend their thinking.  (For more details, please read my post about our red, yellow, and green light thinking routine.)  Chalk talk was the first thinking routine we tried during this time and I found it to be pretty effective- when explicitly taught and modeled.

What I did: The first week we used this I thought I was doing a great job explaining my expectations for what I was looking for.  However, upon reading their responses I noticed a lot of them just copied sentences from the text.  There were very few original thoughts and responses, which is what I wanted to see from the majority of my students.  The following week I decided to model more explicitly with the article they had read the week before.  Because the students had already read it, I was able to read the article (to refresh their memory) through quickly and then we started the process of really looking at what it made us think of, questions we had and ideas we learned.  The process didn't take as long as I thought it would, and then I allowed them to get the new article for the week and try it again on their own as I circled around and supported struggling groups.  THIS was the key!  I tell myself over and over that modeling is so important, but it's also my pace.  I find that even when I think I'm doing a great job modeling-that I'm not taking the time my students need to really go to that deeper level. 
Extend: I really like how simple this thinking routine is.  One thing I would like to do is take the elements of this and combine it with the red light, yellow light thinking routine.  I am planning to use this routine in science and math as I think that it would work well with those content areas where as some of the other routines I find to be more challenging to use.  Also, doing this with 45 students at once was a big undertaking and I think that it will be more manageable with just one group of 23 students.

Challenge:  For this thinking routine, my biggest challenge was finding a way to explain my thinking about the expectations for their responses so that they were held accountable for the time we were allowing them to read together.  I really like the simplicity of the routine, but I would like a routine that is more explicit and shows their thinking with a little more structure.  The picture above shows one of the first chalk talks we did with the very basic sentences that were mostly copied from the text.  As I allowed for more time and practice (and modeling) I found that we were able to use this routine to bring out the deeper thinking.  This was a great routine to prepare us for our adapted version of the red, yellow, green light routine that we began using.  We used this routine for a total of 5 weeks before taking their learning and introducing the new routine.  Looking back, it was a very simple transition that worked well for our students and I am excited to continue learning along with my students!

See, Think, Wonder about Rocks

Connect: At the beginning of our science unit about earth materials I was feeling like I was leading too much of the conversations going on in our classroom.  For our last unit we had used inquiry circles and the students talked, reflected and questioned all about plants and it felt great!  Their interactions were fun and exciting and they learned A LOT!  Earth materials...well it was not having the same 'great' feeling.  The curriculum always seems so plain and not as interactive as I would like. I wanted to feel as though my students were leading things again, but I have a hard time doing the same thing so I was looking for something new.  I also wanted my students to really think about what they were seeing in the rocks, and not tell me what they thought the rock had been through in its history (in relation to the rock cycle as that was our first study).  I decided to try the "See, Think, Wonder" routine in order to facilitate this.

What I did: I began by showing them a picture of a scenic view that had mostly rocks.  I told them that I wanted them to pause and think about what they could see.  They needed to separate their thoughts about how it became what they saw, and just explain what they could see.  We did this silently and they wrote all their ideas on post-it notes.  Next, I asked them what it made them think of.  Finally, what were they wondering now that they had thought and looked at this picture for awhile.  Each step they used a new post-it note and I would collect them.  The first time I did this,
there were both positives in this activity and things I realized we could work on.  They were able to give details in what they saw, but they would also begin to guess or try to explain what they were seeing even with my attempts to divide these thoughts.  This was important to my practice because through their responses I could see that while it isn't always evident each day, they are clearly understanding how to identify properties of rocks and although they tend to jump to conclusions, their conclusions are backed by their scientific knowledge and they are able to identify their process.


 Extend: This impacted my work because I was able to begin allowing them to lead more of our classroom discussions knowing that they were on the right track.  I was surprised by the details that students were able to pick up and explain in their writing. Also, from my experience with some of our other thinking routines I was able to take a step back and continue changing my vocabulary and continue practicing it until I was seeing the outcomes closer to what I wanted in the beginning.  I want to start using this with the rocks the students are bringing in for our rock museum.  I think we will do this one more time as a class with a rock from the museum and then have them try it in small groups and see what happens.

Challenge:  The biggest challenge for me with this routine is taking their amazing wonderings and figuring out exactly what to do with them.  I want them to be able to take those and research and challenge their thinking, but with just me in the classroom and the students still just learning our iPads that would be another challenge that I'm not sure I'm ready for!  At the moment I have been asking students to take some of the questions home (mostly over spring break) and see if they can learn about the rocks in the places they traveled.  The families were very supportive and we had a lot of fun write-ups and rocks brought in, I just need to figure out the next step for our classroom.


Red Light, Yellow Light Adaption

Connect: This year I am trying to integrate literacy as much as possible into my classroom. One way I am doing this is through a combined lesson on Friday's with Jaime Jackson's class.  We decided to use our subscription to 'Scholastic News' and 'Time For Kids' to help facilitate these lesson and called it 'Non-Fiction Friday's'.  Last year I had done something similar with Val Beckler, but this year we decided to use this time to incorporate some of the thinking routines from PLC's in order to give more structure to this time.  We have tried several and our favorite soon became "Red Light, Yellow Light."  It had many of the elements we really want our students to look for as they are reading, especially in non-fiction.

What I did: The red light, yellow light thinking routine involves having students identify what makes them stop while they are reading and what make them think during their reading.  We decided to be very specific in naming what we want them to identify and adapt the routine just a little to make it fit better into our classrooms.  We added a green light so that it had all the colors of our behavior system and used colored post-it notes to make it more visual for our students.  For red, we wanted students to stop and think about the main idea of the article.  "What was the authors purpose for writing this piece?" For yellow, students wrote one question or wondering they had while reading.  "What did this article make you curious about?" Finally, for green, students wrote one thing they learned from their reading.  "What is something new you didn't know before you read this?"
Each Friday we group students up with a buddy.  This changes each week, but they normally pair with a student from the other class in order to promote a cohesiveness between our two homerooms.  Each pair gets three sticky notes (red, yellow and green) and they work together to read the article and write the main idea, question/wondering, and identify what they learned.


Extend:  In order to really make this routine effective, we have used it (so far) for a total of 13 weeks!  Now it truly has become a routine and the students are able to identify each part of their thinking easily.  Their questions are becoming deeper and you can really see their thinking becoming more collaborative.

Challenges:  In the beginning the challenge was having students slow down and identify each part of their thinking.  Over time, the process began to really take shape through modeling, collaboration and class discussions.  On Fridays the modeling takes much less time and even though we review the 3 elements, the students are leading the discussions more and more because they are very comfortable with the routine.  The biggest success is the amount of time we have used and developed this routine.  It helps me take a step back when starting new ones realizing that after practice, they too will improve and begin to show the results I was expecting the first time!

Sunday, March 10, 2013

4 C's (adapted for ECE)


Connect: Because ECE children have so much schema to build, a strategy we use consistently during read-a-louds to deepen understanding is asking the children to make personal connections. Because of this, this routine was a natural selection. We use several themes and texts in our teaching to also promote text-text connections so the children begin to recognize similarities and differences in stories. 

What I did: For this exercise, I chose the Gingerbread Man, The Gingerbread Boy, The Gingerbread Baby and The Gingerbread Girl and asked the children to reflect on the settings in each, the characters, the different endings, the different repeat phrases, their connections, and the behaviors of the various main characters.

Extend: In ECE we are working on adapting many of the routines so they are developmentally appropriate for preschool age children. It made sense to use this routine because we focus so much at this age on children making connections. It was a challenge however to modify the routine in relation to concept, challenge and change so it reflected in their thinking as opposed to the literal challenges, concepts and changes.

Challenges: As stated above, the routine itself was difficult to modify so that it went beyond the literal. Because preschool age children are so literal, egocentric and in the present, it is difficult for them to reflect on how their thinking has changed over time and why. To them they just know what they know. Considering this I chose to do the routine anyway but more with a focus on the on how the main character's behavior changed and how this behavior affected or caused the different endings. I then asked them to reflect on the behaviors, take a point of view and explain/defend it. For example one child explained that in the Gingerbread Baby Matti did the wrong thing by opening the oven door and letting the baby out, but then he made the gingerbread house for the Baby to live in and be protected so nobody could eat him. Also Many children felt it was fair that the fox got to eat the cookie in several stories because the old man or old woman made the wrong choice by opening the oven too early. Many also said in several stories that the fox was mean or bad because he tricked the gingerbread man, but one child noted he was smart and therefore should get the cookie. 

Reflection: In the end, despite the challenges for ECE with this routine, I was impressed with the deep thinking made by the children. With this simple modification, the children were much more engaged in the activity and I believe the lesson was more powerful as a result. Because they had to reflect not only on the characters behavior as well take a stand on whether it was fair or not who ate the cookie, the similarities and differences in the book became more transparent to the children beyond just how they were similar and different. They truly saw how the behavior of the gingerbread boy, girl, baby, man, fox or Matti led to the cookie being eaten or not. Of course, many of the children made connections to making cookies at home and eating them. I would like to try this routine with similar texts and their various versions to figure out how to use it most effectively...perhaps with other classics like The Three Bears or The Mitten. However, I would also like to find ways to use it that match more closely with the original purpose. In the end however, our discussion about these books was much more meaningful than in any year in the past when we strictly reflected and charted the differences and similarities of the books.  

See Think Wonder (Winter)


Connect: In ECE, I am trying to use the See Think Wonder Chart as a basis for starting every unit with my students. It is very developmentally appropriate for this age group as a way to document their thinking and drive deeper level thinking. My hope was that by showing the children pictures with items they were familiar with, they would make their own connections.

What I did: To start our unit on Winter, I selected 2 pictures and my para and I each worked a group on our own separate charts. The first picture is of a person walking down the street with a shovel; the other a person walking on the sidewalk with a sled. The big idea was to hopefully get the children to recognize the pros and cons of winter. Shoveling is hard work while sledding is fun. Winter brings both challenge and great fun all in one. The "See" part went smoothly as the children labeled what they say in the picture. The "Think" and "Wonder" parts of the routine were more difficult because I think my children struggled between the difference in the "think" and the "wonder" part.

Extend: My goal using the routine this way was to try to introduce a unit beyond just reading a book about winter and asking teacher directed questions about what they think about winter. I wanted to use the pictures to see if they would come to these pros and cons about winter on their own.

Challenges: Honestly, I found this lesson disappointing. The children were so literal in what they saw and had difficulty thinking and wondering beyond..."I think he is going to shovel the street" or "I wonder if she went sledding". One child even thought the person was going to find a bear. We did however have a deep conversation after one child said "I think he is going to the beach." Another child responded by saying, "That's impossible". When I asked him to explain his thinking he shared that the beach is too far away to walk. We then talked about how the beach is somewhere where it is warm and if the person is in snow that must mean it is winter and they are faraway from a warm place. In the end, what seemed like a rather silly comment turned out to provoke the deepest thought. I also realize I may have actually learned more about the routine because of how poorly it went. It was a lesson for me for several reasons. One is that I now remind myself these routines are to be used as guides rather than rigid structures. I need to be flexible and not be so hard on myself when it doesn't turn out the way I expect. Perhaps these routines are best approached not predicting the outcome. The importance is in the process. Also, the items or photographs presented are probably best when more ambiguous. Preschool age children are so literal and because this is still a fairly new routine for us, it was hard for them to move beyond the obvious. I had also enlarged the photos too much and believe the fuzziness made it hard for them to see the actual item each person was handling. Next time I will try to be more intentional and careful with the photos or items I choose.


Color - symbol - Image


Connect - I attempted this thinking strategy with eighth graders during our chemistry unit. We had previously learned about the structure of an atom and were ready to study the elements in the periodic table.  I like to use a lesson called "adopt an element" to have students make connection to an element and a use in their everyday life.  I modified this lessons to include "color, symbol, and image."

Extend- For the symbol part, I asked students to use the standard symbol that they would find on the periodic table, which includes the abbreviation, atomic number, and atomic mass.  For color, I asked students to come up with a color that is reflective of that symbol. I encourage students to challenge their thinking and not be so literal. For example, most elements are metals, and was hoping that they would not simply use gray or silver for their color.  Then I asked students to draw an image reflective of their element. To take their thinking a step further, I asked students to come up with a slogan about their element.

Challenge - I was overall a little disappointed with the results of this lesson.  I was expecting students to stretch their thinking and turn in some amazing stuff.  Most students chose to be literal with their color choices- grey and silver for metals, "clear" color for gases. The images produced were more literal than I was hoping - like a drawing of a chunk of metal, rather than its applications.  There were some students, however, that produced some surprising results.  One example, shown above, was exactly what I was looking for. His element is radon, a clear toxic gas.  He chose the color red to symbolize danger and drew an image of person with lung cancer. His slogan was spot on too, and it actually rhymed: Radon is a radioactive gas in the fresh air. But be aware in can also cause lung cancer, so be aware. I will use this as an exemplar for future years.


Saturday, February 23, 2013

Concept Maps


Connect: In ECE so much of what we do is support children in building background knowledge/schema. One of the most effective ways we do this is asking the children to make connections to themselves especially since at this age they are still so egocentric. Considering this, I knew that using a Concept Map would be one routine that would be developmentally appropriate for my 4 year olds. I had not read Making Thinking Visible at the time that I tried this routine but had in fact read another book for ECE (Young Investigators) over the summer that had talked about Concept Maps. It however did not offer the detail of a Concept Map as a thinking routine in that it did not go as deep as to demonstrate making connections between ideas. Now however based on Making Thinking Visible, I have a much clearer sense of how to use this as a thinking routine with my students.

What I did: At the beginning of each year, we do an All About Me Unit. Thinking about this I thought a Concept Map would be a meaningful introduction into our Unit. The children had some familiarity with it as we used a concept map and inquiry circle to talk about school. Of course since my children are not yet reading or writing at this stage, we did this as a whole group with me taking dictation as the children shared their ideas. They basically just took turns adding to the map as I jotted down their ideas.

Extend: Using the Concept map helped me not only to understand how I could use the Concept Map as a pre-assessment to drive my instruction but also see how I could support them in understanding how to make connections between ideas. I also learned that it is a great tool to help them collaborate and learn from one another.

Challenges: Because I am dealing with emergent writers and readers, my challenge with this routine is considering how to use pictures or other symbols as a means to be able to go back to the map at a later date so the children can comprehend it and use it as a visual tool. I don't know how else to make it useful for my students without having to always verbally summarize it for them and yet adding enough pictures and symbols is very labor intensive.  Considering this, my challenge is using it during the unit to review and demonstrate new learning. Next Time, I would definitely add more pictures and color to illustrate new learning. And now that I have read about it in our book, I have a better idea of how to use it as a means to make connections rather than just as a map.

Friday, February 22, 2013

Headlines

In the middle of a science unit on life cycles, I wanted to do quick assessment to find out what kids knew so far.  I did the "headlines" routine.  We started out by looking at real headlines in newspapers and online to determine their purpose.  Students looked at real headlines then talked about what they thought the article was going to tell us.

This was important to my practice because I felt like I had lost touch with what the kids were actually learning and if I was teaching to the bigger picture objective of the unit.  Kids typically have a lot of schema on this topic and I wanted to check in to see where I needed to go.  I also needed to find out if there were reteaching opportunities.

This impacted my work because I felt that the kids were right on track.  I was surprise by the details that students had picked up along the way.  It was also interesting how many kids wrote their headlines as questions to express their wonderings or misconceptions.  One student wrote in response to our hatching and raising triops, "Triops... Why Are They All Dying?"  This lead to a great discussion in the third grade about the scientific process and that everything does not always go as planned.  What if you set up an experiment with the triops and in the middle of your observations, they die?  What do you do next?  What can you conclude from this?  What could be a reasonable hypothesis for why they are dying?  Another student wrote, "Only Two of Nine Seeds Sprouted, Why?"

I think this was a good thinking break for my students.  We were "doing" a lot.  We were observing four different organisms in my classroom (triops, mealworms, caterpillars and sweet pea plants) and this was a good break in the "doing" so we could reflect on why we were doing it and to reset for what we were going to do next.

In thinking about how I will use this routine in the future, it reminds me of the importance of slowing down.  I get caught up in worrying about how I am possibly going to get everything done, but it is so important to slow down to make sure the learning is on target and that we all know where we are going next.  There is a difference between the amount that I am teaching, and the amount the students are learning.  Sometimes I teach like mad and, upon reflection, wonder if they are really learning what I had intended.  I was also impressed with the output of the students.  This was a fairly simple routine and yet their little headlines were very profound.
 Generate- Sort- Connect - Elaborate
 This is an example of the generate, sort, and connect part.

My students in my skills class are needing word work to help break down vocabulary for meaning. I had my kids generate lists of prefixes on their desks with whiteboard markers. From there they partnered up with another student and compared their lists. I asked them to look at words that had similar roots following the prefix. They wrote "roots" on a large sheet of paper, chose 3-4 four of the ones they discovered coming off of branches from these.

Once this was done, I asked them to generate a list of words using these roots. They branched off of the roots with as many examples as possible of real words they could come up with by using our original list of prefixes and adding any suffixes they could think of.

At the end of this, I counted up each partnerships real words and gave them a prize.

Then I asked them to connect words that had similar prefixes with one color and similar suffixes with another color (look at the picture in green and orange to see a good example).

 This is an example of elaborating to create words.


Once they have connected all of their words with similar roots, they study them to try to discern what each piece means. If you look at the picture of the definition of roots, you can see how they did this.
This is a word students made up by understanding three different parts of words.


I then asked them to make up a non-real word using a prefix, a root, and a suffix. They then wrote out a definition to this non-real word in order to show their understanding of how these three pieces work together to create meaning and change parts of speech.

This lesson was important to my students and I because they need vocabulary building strategies and an understanding of parts of speech.

Friday, February 8, 2013

Generate-Sort-Connect-Elaborate: Concept Maps

What we're working on & why it's important:
As we returned from holiday break we dove into our study of  Denver & Colorado. In kicking off our study we went on a field trip to the new Colorado History Center. Before we visited the museum I knew the amount of background knowledge the kids had varied, and I also knew they'd return with a plethora new knowledge. Therefore, I decided to use the concept map as a structure to hold and organize their thinking, as I can't expect them to immediately hold, understand, and make meaning of their learning.


What I did:
One day prior to our trip we began by listing everything we knew about Denver or Colorado on a blank piece of paper. As you can imagine, our background knowledge varied. Some kids wrote places they'd visited around the state, and others listed things such as Broncos and skiing. Then after returning from the Colorado History Center we went back to our brainstorming and added more people, places, things, etc. that we know about Denver and Colorado. Finally, I asked them to flip their paper over, and write 'Colorado History' on the center of their paper. From there, students placed  items from their list on their 'map' in relation to importance. If they thought something was really important they placed it close to the center box. If an item was not that important to Colorado's past or present they put it near the outside of their paper. Then, partners shared at least three items on their map with one another explaining why they placed the item where they did on their map.

What I learned:
The conversation was the best part of the routine. Hearing the students defend their decisions is where the learning occurred. From conversing with one another, some students changed their thinking, agreed to disagree, or left pondering certain topics.This routine reminded me again of the importance of conversation. I was surprised by the amount of knowledge students brought back and how different it was. When the students completed these concept maps I was able to assess what information they took away from the museum, which helps guide my instruction.


Impact on Instruction & Students:
I didn't intend for this map to serve as a pre-assessment, but it did. Therefore, it has helped me plan through our unit. The field trip and concept map together also sparked the students' interest in Denver & Colorado, which has helped guide our study.

How will I use this learning in the future:
In the text, the final step of this routine is the connecting phase. Students draw lines making connections between items on their map. We have yet to complete this step because I didn't feel like the kids had the background knowledge to make the connections yet. I plan on going back to this at the end of our study as a way to for students to synthesize their learning. I feel like I'd like to use the concept map again in the future as a way to organize our thinking. Perhaps we could use them to help us chronologically organize our thoughts about a certain period in history... 


I Used to Think, Now I Think

This month I did the routine called, "I used to think, now I think."  In third and fourth grades, we have been focused on perimeter and area.

I already knew that students have a hard time with perimeter and area.  Mainly, they seem to mix up these two terms.  We spent time exploring perimeter and area in many different ways in my classroom.  We used geoboards on the iPads to build rectangles with a given perimeter and area, we measured them on "hallway polygons" taped down in the hall, we measured the area of Sao Paolo, Brazil to experiment with irregular figures, and we used base-ten blocks to explore the many ways to make a figure with an area of 5 square centimeters.

This routine extended my thinking because it gave me a window into what misconceptions students still had.  It also gave students a way to express in words what math thinking was going on in their minds. Here is a sample of what kids shared:
  • I used to think perimeter was by multiplication.  Now I think perimeter is by addition and base times height = area.
  • I used to think perimeter and area were hard becaus I did not know what was the inside and what was the outside. Now I know that perimeter is the outside of a shape or polygon and area is the inside of a shape or polygon.
  • I used to think area and perimeter were the same thing and would add both together.  Now I think perimeter is the outside of the area.  Area is the squares inside the perimeter.
The fourth graders reflected on Edmodo, which was  great option because I was able to give them some feedback.  A sample of one student's post and our conversation on Edmodo is below.
A challenge or puzzle I have is, would this have been a better activity had I given them the "I used to think" before I taught perimeter and area?  In the past, students in third and fourth grade have been hard pressed to tell me all they know about a topic when they had limited schema.  However, my third graders had a difficult time thinking back to a time when they knew less about this topic than they know now.  Many of them said, "I have always known about perimeter and area."  It helped for them to think of another student, a second grader, coming into our room and thinking about how little they may know about this subject and then to comment on how little they used to know.  The book says to stick with doing both at once at the end of a subject because students can't possibly identify misconceptions and ingrained assumptions until they have been confronted.  This type of reflection can only happen after new learning has occurred.   The book also suggests that students will do better as this is established as a regular routine.  I regularly have students reflect on their learning, but I think that the process has become bogged down, so this was a good way to switch it up on them so they had to reflect in a different way.  I am going to keep this reflection routine in my back pocket and try it again with both classes and see if there is improvement in the depth of their responses.


Tuesday, February 5, 2013

See Think Wonder

As I use the thinking strategies, I come back to the concept of routine.  I realize an effective routine truly needs to be done with consistency, and in a manner that allows it to become part of our schema.  Up until now, I have tried routine after routine.  Finally, I am confident to say, that I will use the See Think Wonder routine throughout our study of Denver and Colorado.  This routine was so successful as a way to launch new content learning and facilitate discussion that I am sure to use it with each new content area.


First, students read an article about the Basketmakers in pairs to build background knowledge.  I modeled See Think Wonder in whole group and then students participated in groups of three.  They were given a photo, created a graphic organizer on white paper and I timed each section.  What do they see in the picture?  What do they think and what is that inference based on?  What do they wonder about?  This is where their thinking went beyond the photo.  Then, we used the organizer to share our thinking in new groups.  Finally, students synthesized their understanding by writing poetry, comics, stories and newspaper articles.

Connect - When beginning a new unit, it is invaluable to connect new learning upon prior knowledge.  The use of this strategy gave the students an interactive and visual way to activate their schema.  As they began to infer, they were able to look past the obvious and postulate ideas.  This led to natural wonderings based on clues they may have missed if they weren't given the time to truly examine the picture.

I connected to this routine because I am such a visual learner.  The aesthetic helps me to remember!

Extend - I believe the extension came from slowing down to focus and notice the details of the pictures.  We became archeologists for awhile and used our new knowledge to share with each other in a jigsaw discussion.

Challenge - Next time, I will provide pictures with details that challenge student thinking. Though the simpler photo's provided the opportunity to search and extend thinking, the students with more interesting pictures were really excited about their learning.  I will also model out of the box thinking based on tiny details to expand student license. :)


Sunday, January 13, 2013

The Explanation Game

I used the Explanation Game during this lab.  The explanation game involves naming it, explaining it, giving reasons, and to generated alternatives.


Students have been studying the Law of Conservation of Matter and investigated a rusting reaction to reinforce the concept. Students put wet steel wool in a beaker and covered with a balloon to make a closed system.  Students found then mass of the beaker.

After the steel wool rusted, they also found the mass - which they found to be the same after reaction.  Students were asked to NAME the process - and identified it as observing the Law of Conservation of mass.  Students were then asked to EXPLAIN the Law of conservation of Matter using a word bank (after, mass, oxygen, rust, steel wool.)

During the reaction the balloon got sucked into the beaker.  Students were asked to GIVE REASONS why the balloon was sucked in, but need to look at the chemical equation:  4Fe  + 3O2  --> 2Fe2O3.  Students corrected said that oxygen was taken out of the air in the beaker and added to the rust, thereby creating a vacuum.

Students were then asked to GENERATE ALTERNATIVES.  I asked students to infer what would happen to the mass if there was a hole in the balloon.  As a class we discussed the difference between an open and closed system. Students correctly inferred that a hole would allow oxygen to enter the system from outside the beaker thus making the mass higher than before.

Connect - This lesson connected to what I already know because I understand the importance to looking at the big picture, which often is a process that I hope students make a connection to.

Extend - This lesson offered a good variation from what I typically asked students to do during an investigation that is not conducive to follow the scientific method.

Challenge - I contemplated using this investigation to kick off the unit before students already had a good understanding of the Law of Conservation of Matter from reading about it.  I am curious if this lab would have more impact if I followed more of an inquiry model.